Your Cart is Empty


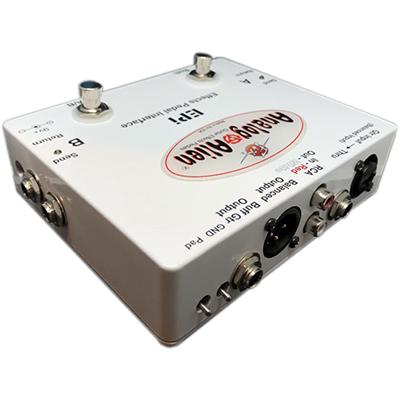


Introducing the Analog Alien EPI (Effects Pedal Interface)
These days, many artists/musicians have a desire to use guitar pedals in ways that they were not designed or intended to be used – especially when it comes to recording. How great would it be if you could send your vocals, drums, keyboards, etc… through an effects pedal and come up with a sound that no one else has? Well, now you can do all that and much more with the Analog Alien EPI (Effects Pedal Interface).
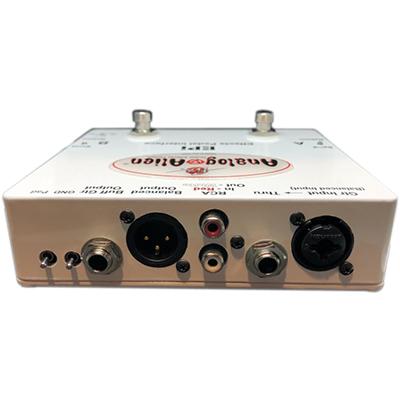
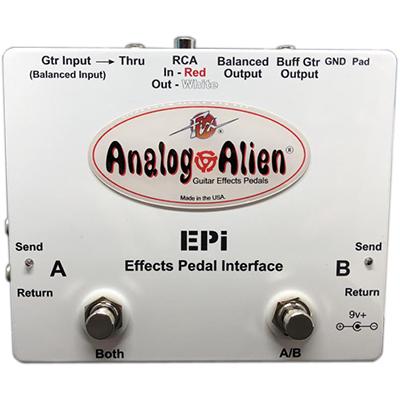
The EPI is a high-end routing pedal that enables you to take the signal from your effects pedal and record it directly into your DAW, or analog tape deck, professionally – without any loss of signal or fidelity. The EPI does this by automatically adjusting the impedance and voltage levels coming from your effects pedals, so that they will interface properly with professional recording studio levels. The EPI also has RCA -10 dBu input and output jacks, for connection to non-professional signal operating levels.
The EPI has two separate insertion points that are independent of each other – A&B. These insertion points enable you to set up two separate signal chains and switch between either of them, or have them both on at that same time. You can blend both signal paths independently from each other, and then combine them at the balanced XLR, buffered 1/4″ or RCA -10 dBu outputs.
You can also plug the output of your stomp box directly into the input of the EPI and take advantage of its unique input circuit. Your distortion and overdrive pedals will take on a whole new sonic dimension when you record them using the EPI.
The input of the EPI can also accept a direct signal from the output of your DAW or mixing console. You can send a pre-recorded track to any effects pedal and then re-record the signal back into your DAW. If you ever wondered what your vocal or snare drum tracks would sound like through a fuzz pedal, now you’ll know.
The EPI can also be used as a, A-B box, with both A&B on at the same time, a Direct Box (DI), a Re-Amp Box, or you can split your guitar’s signal and send it out to 4 separate amps, with 4 separate effects, all at the same time!
In live stage situations, you can hook up two separate pedal boards to the A/B insertion jacks and have each board on independently, or both on at the same time, while simultaneously sending your effected signal to the house PA and your guitar amp!
The Analog Alien EPI will enable you to use your effects pedals in ways you never even thought of. You’ll never look at your effect pedals in the same way again.
Using the Analog Alien EPI.
We’re sure you’ll find uses for the EPI that we haven’t thought of, but we though that we would give you some suggestions on how to get started. Refer to the PDF file for suggested hookup and connection to the EPI.
DI Box.
Plug the output of your guitar into the main input of the EPI. Use the Thru jack to send your guitar’s signal to your amp. Use the Balanced Output XLR connector to send your guitar’s signal to your recording console or DAW.
Re-Amp Box
Take a balanced signal from your DAW or Analog Tape deck, and plug it into the balanced input of the EPI. This will enable you to take a pre-recorded track, coming from your DAW, or analog tape recorder, and send it out to your amplifier via the buffered GTR output. In this configuration, you can use the EPI to send a pre-recorded guitar track back into your amp for re-amping. You can then mic the amp and record the amplified signal back onto a separate track. With the EPI set up this way, you can take any pre-recorded track and send it back to an amplifier for re-amping.
A-B Box.
You can use the insertion points on the EPI as an A-B box. You can send your output signal to either A or B of both at the same time.
Record directly with your effects pedals.
You can now use your effects pedals to record directly to any recording medium you choose; with out any signal loss or fidelity. Simply connect any effects pedal or pedals, to either one, or both, of the A or B insertion jacks. You can use the “A-B” foot switch to switch between the two insertion or have both A & B on at the same time by engauging the “Both” Switch. You can send a signal directly from your effects pedals straight to your DAW or analog tape deck for direct recording. You can also plug into your effects pedal and send the output signal from it, to the main input of the EPI. With this configuration, you can take advantage of the EPI’s unique input stage and send the effects signal into your recording device using the balance XLR output – while at the same time send the same signal to the thru jack and buffered 1/4″ outputs. The EPI will even take the same signal and bump it down to -10 dBu, so you can send it to a nonprofessional level dice or even your iPhone! All of the outputs on the EPI are available at the same time.
Adding effects to your existing, prerecorded, tracks.
Plug the balanced, XLR, output from your prerecorded track into the main input of the EPI. Using the insertion points, insert any effects pedal or pedals of your choice, into the signal chain. Take the effected balanced signal, coming from the XLR output of the EPI, and send it back on a separate track, to your DAW, or analog tape deck for re-recording. You can hear what your voice sounds like recorded through a fuzz box!
Record directly with your effects pedals at -10 dBu levels.
The EPI will take any -10 dBu signal, from it’s RCA input jack, and send it out -10dBu via the RCA output jack. The EPI can also take the same -10 dBu input signal and send it to the 1/4″ buffered output, the two insertion sections (A&B), or bump it up to +4 dBu level and send it to the balanced XLR connector for professional recording.
Using your 500 rack modules with the EPI.
You can take the output signal coming from your lunch box of 500 rack modules and interface them with your effects pedals – in both studio and live situations. Simply plug you instrument or Mic into your lunch box. Take the balanced output from your lunch box and send it to the input of the EPI. The EPI will take that signal and send it to one or both of it’s insertion points. You can plug your pedals into both A&B insertions points and feed the signal coming from your 500 rack modules into the input of your pedals. The EPI will then combine all of the output signals and send them to the balanced XLR, 1/4″ buffered output, and -10 dBu output – all at the same time!
Bypassing your entire pedal board.
Plug your pedal board into the send and return of the insertion “A”. Do not have anything connected to the “B” insertion section. When nothing is inserted into the insertion points they are in turn bypass mode. Now use the “A-B” switch to go between insertion “A”, which has your pedal board plugged into it, and insertion “B”, which has nothing plugged into it. With this configuration you can use the EPI to switch your entire pedal board in and out of your signal chain.
Using up to 4 amps at one time, while simultaneously sending your signal to both balanced and unbalanced outputs!
Plug your guitar into the input of the EPI. Use the “Thru” jack and send your guitar’s signal to amp #1. Use the sends from both the “A&B” insertions to send your guitar’s signal to amps #2 & #3. Take the 1/4′ buffered output and send it to amp #4. You have just connected your guitar to 4 amps, simultaneously! The EPI will still send the output signal to the balanced, XLR connector, and unbalanced RCA jack, too. That’s 6 independent outputs, all at the same time with out any loss of signal or fidelity!
The Brian May recording setup.
Legendary Queen guitarist, Brian May, has been know to record his guitar using 3 separate amps, all at the same time. Each amp is fed by 3 separate delay boxes. You can duplicate this setup using the EPI. Plug your guitar into the input of the EPI. Use the “Thru” jack and send your guitar’s signal to the input of your delay pedal and then send the output of the delay to amp #1. Use the sends from both the “A&B” insertions to send your guitar’s signal to two separate delay pedals and then into amps #2 & #3. You now have 3 separate amps that are seeing the signal from 3 separate delays all at the same time. Mic each amp up individually and record them onto 3 separate tracks. And you can still send your guitar’s signal to the balanced XLR, 1/4″ buffered and RCA -10 dBu outputs!
Switching between two separate pedal boards live on stage.
You can plug two separate pedal boards into the EPI’s insertion points, “A&B”. Use the “A/B” Switch to switch between the two pedal boards. You can even have both on at the same time using the “Both” switch. You can send the output of both pedal boards to your amp via the buffered 1/4″ output. You can also send a balanced signal to the main house PA by using the XLR balanced output connector.
PLEASE NOTE: Pedal does not include 9v Power Supply in Australia.